
Sunbeam Ridge Crochet Blanket – Easy Textured Blanket Pattern
There’s something special about creating a blanket that feels like a warm hug, and that’s exactly what the Sunbeam Ridge Blanket is to me. This design was inspired by the way sunlight dances over rolling hills, casting soft, textured shadows—just like the stitches in this pattern. It’s cozy, beginner-friendly, and completely customizable to any size.
Whether you're making it for yourself, a loved one, or a thoughtful gift, I hope this blanket brings as much warmth and joy to you as it did to me while designing it. In this post, you’ll find the free pattern, a step-by-step guide, and a simple formula to adjust the size so you can make it just right for your space.
Grab your favorite yarn, a comfy spot, and let’s get stitching!
If you'd like to support my work and get a printable, ad-free version of this pattern, please visit my shop or Ravelry.
If you like my crochet content but aren't interested in buying my patterns, that's perfectly fine. :) I offer my patterns for free on my blog so everyone can access them!
Additionally, there's an alternative way to support my work through Buy Me a Coffee (in my case, it's Buy Me Yarn, and you know the reason:) ). It's even cheaper than my current patterns. For more information, you can click the link above or the button below.
HUGE THANKS to everyone who supports me through purchases, likes, shares, comments, tags, or feedback! It truly means a lot to me.

This pattern and all images associated with this pattern cannot be sold or claimed as your own.
You are allowed to sell finished project. Feel free to mention me for creating this pattern, it would make my day and I can share your finished blanket on my social media if you allow.
Don’t forget to share your project on Instagram! If you have your account you can tag me under
@happyheartsy. I would love to see your finished Heartfelt Threads Cardigan so I can share it with others.
Before we get into the actual pattern I also created the Ultimate Crochet Hack Sheet! It's 2 pages with basic
crochet abbreviations and symbols, hook sizes in US and UK version, all the yarn types (with recommended hooks and projects) etc. Feel free to click on the pic or a link to my shop where you can find more details.
What you need for this blanket:
Yarn - Bernat, Softee Chunky yarn, Acrylic #6 Super Bulky, 14oz/400g, 431yd/394m
Hooks - 10mm / N
Scissors, Yarn Needle, Stitch Markers
How many skeins you need approximately for this blanket: 4
Gauge:
8 rows section x 8sts (in DTR row) = 6.5" x 4"
Measurements:
48" x 67"

NOTES:
You always have to have even number of the stitches for this pattern
This pattern repeats 8-row section + starting with 2 rows of DTR row
This blanket is crocheted sideways
Scroll down for the photo tutorial how to crochet Double Treble Crochet and Wheat Stitch (Modified Puff Stitch)
How to Find YOUR Size for the Blanket!
Make Your Swatch: It’s important to make a swatch to determine your tension, ensuring your blanket ends up the right size. Your swatch should be at least 10 rows long (follow the pattern for the 8 rows section) and 5” wide, which will help you calculate how many stitches fit in 4" section and how many inches 8 rows will measure, since the pattern repeats in 8-row sections.
Formula to Determine Your Blanket Size: Let’s use my gauge swatch as an example:
8 rows = 6.5"
8 stitches = 4"
Now, let’s say you want your blanket to be 52” x 60”.
For the Rows:
Divide your desired length (52”) by your swatch’s row measurement (6.5”):
52 ÷ 6.5 = 8
This means you’ll need to repeat the 8 rows 8 times to reach the desired 52" width.
Important! Don’t forget to add 3” for the first two rows (this is because your blanket starts and finishes with two rows of double treble crochet).
For the Stitches:
Divide your desired width (60”) by your swatch’s stitch measurement (4”):
60 ÷ 4 = 15
Multiply that by the number of stitches in your swatch (8):
15 x 8 = 120 stitches
This is how many stitches you need across the length of your blanket.
Abbreviations:
Ch - chain
FDTR - foundation double treble crochet
St - stitch
HDC - half double crochet
FLO - front loop only
SC - single crochet
Sk St - skip stitch
Puff Stitch

DIRECTIONS
Ch 138
ROW 1 - Into the 4th ch from the hook make your DTRC. Make DTRC until the end of the row. (136 sts in total) Then Ch 3 (counts as a first st for the next row) and turn. (Continue with ROW 2) YT - 2:05 - Foundation Chain + Row 1
OR
FDTRC - 136 = this counts as a ROW 1. At the end of the row, ch 3 (counts as a first st for the next row) and turn. YT - 8:16 - How to Foundation Double Treble Crochet
ROW 2 - Make your DTRC in each stitch until the end of the row (136 sts in total). Ch 1 (it does NOT count as a st) and turn.

ROW 3 - Make your HDC into the first st. HDC in each st until the end of the row. Ch 1 (does NOT count as a st) and turn.
ROW 4 - Make your HDC into the very FLO into the first st. Repeat this until the end of the row = HDC in FLO until the end of the row. Ch 1, turn) YT - 15:34 - Row 3 + 4 - HDC in FLO

ROW 5 - Make SC into the first st, sk st and then make SC, YO and insert the hook into the skipped st, pull up a loop, YO and repeat once again, insert the hook into the same skipped st and pull up a loop (you should have 5 loops on your hook), now pull up a loop through 4 loops only then YO and pull up a loop through two remaining loops. Sk St and then make your SC, now you repeat the modified Puff Stitch into the skipped st. Repeat this until the end of the row. Once you finish your last Puff Stitch, you should have one more st left, into that one make your last SC. Ch 1, Turn.
ROW 6 - Repeat ROW 5. Ch 3, turn. YT - 20:52 - Row 5 + 6 - Wheat Stitch
ROW 7 and 8 - You make DTR in each stitch (don’t forget that at the end of the ROW 7 you make ch 3 that counts as a first stitch of the next ROW 8). Ch 1. Turn. YT - 26:04 - Row 7 and rest of the pattern
From now on you repeat ROW 3 to ROW 8. Your blanket should end with two rows of DTR.
How to Double Treble Crochet
Once you are done with your FCH, YO 2x (you should have 3 loops on your hook) and then insert your hook into the 4th ch from the hook and pull up a loop (you should have 4 loops on your hook).


Then YO and pull up a loop through the first two loops only (3 loops on your hook). YO and pull up a loop through the first two loops again (2 loops on your hook) and one last time YO and pull up a loop through the remaining two loops.


How to Crochet Wheat Stitch (Modified Puff Stitch)
Into the first st make your SC, then sk st and SC. Then YO and insert the hook into the skipped st where the arrow shows (pic 2), pull up a loop (three loop on your hook).


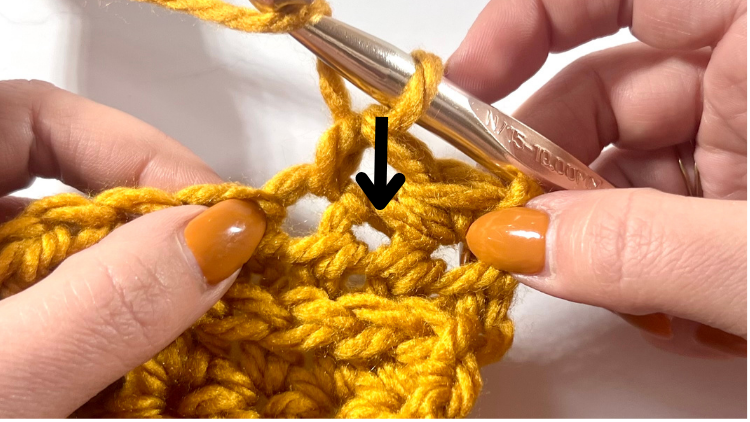


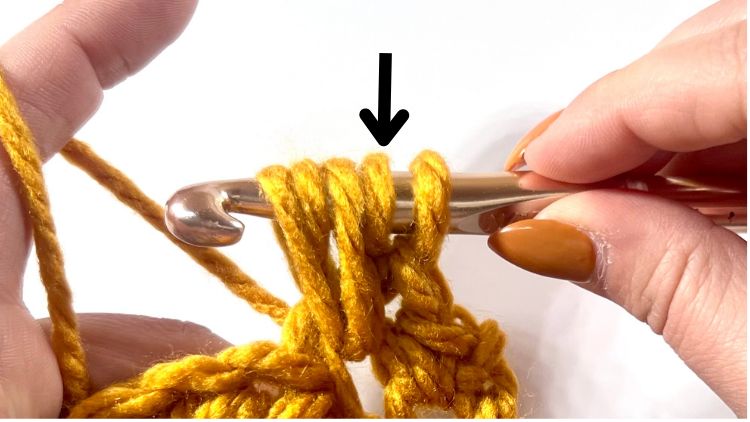
One more time, YO and insert the hook into the same skipped st and pull up a loop (5 loops on your hook). YO and pull up a loop through the first 4 loops only (two loops on your hook). YO and pull up a loop thrugh the remaing two loops. Now repeat with sk st and then your SC into the next one and Modified Puff Stitch into the skipped st.


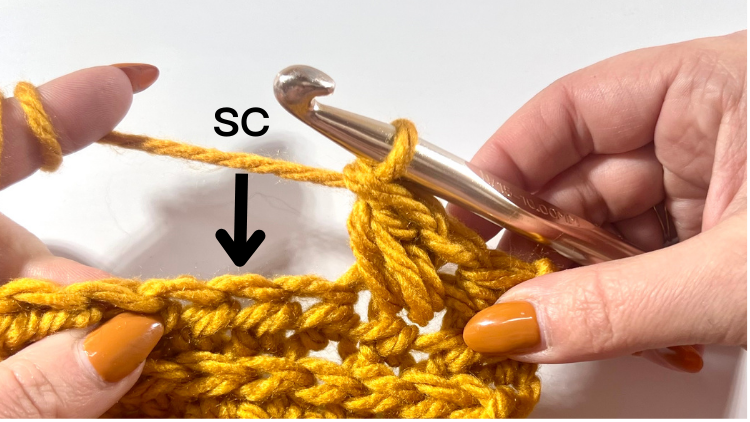
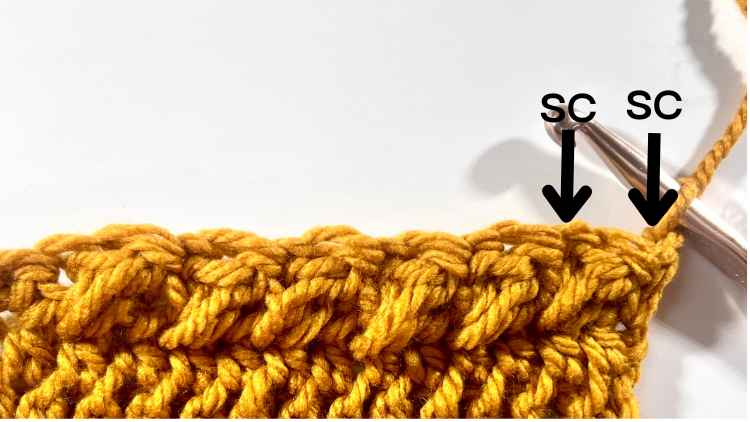
Once you finish your last Wheat Stitch - Modified Puff Stitch, you should have one st left where you make SC. Ch 1 and turn. Your next row begins with SC into the first st, sk st, SC and then you start with your first Wheat St.


Ta-da! Your Sunbeam Ridge Blanket is complete! You're welcome to leave a comment about your thoughts on this pattern and share it with your friends!


