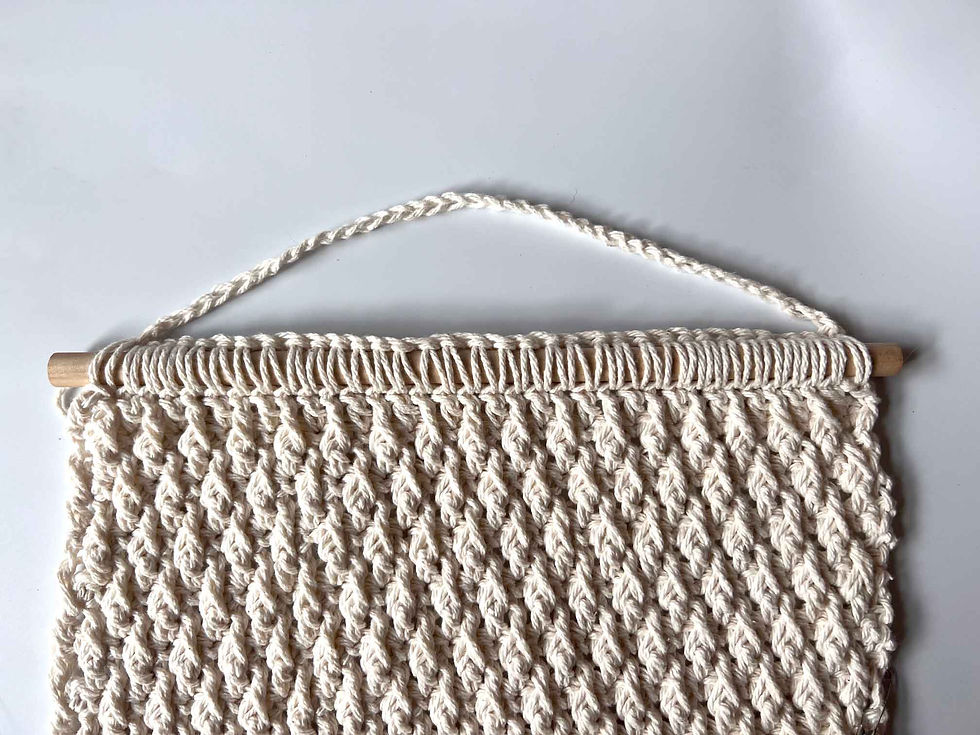
Baseball Hat Organizer Free Crochet Pattern
I have to admit I really love to have a clean house. Who doesn't, right? Especially when I am at home all day I can't properly function when it's messy. I feel in peace when it's clean and I can fully focus on my kid or my work and I am not distracted by anything.
So my home is a huge inspiration what I can crochet and make a pattern for everyone so everybody can feel in peace like me. This Baseball Hat Organizer is absolutely perfect? Not only that it looks really cool on your wall but it's also practical.
Now it's your turn to decide what version you'd like more. The pattern is made for the baseball hats only or also for your glasses or anything you can hang it. You can see this version on the pictures below because this way my glasses got their place too.
I hope you enjoy this pattern and even more the actual final hat organizer! If you are more a visual learner I've got you covered with an additional video tutorial where I explain everything you need to know for this pattern so definitely check it out.
If you'd like to get ad free and printable pattern, go to my Etsy shop or Ravelry where you can find this pattern for a low cost.
If you enjoy my crochet content but you don't feel like to purchase my patterns it's absolutely ok.:) That's why my patterns are free on my blog so it can be available for everyone!
There's also another way though how to support my work with Buy Me a Coffee (my version is Buy Me Yarn, you know why:) ). It cost you even less than my actual patterns. You can check the link above or the button below for more details.
BIG THANKS for everyone who supports me by purchases, likes, shares, comments, tags or/and feedbacks! It means a lot to me.
Don’t forget to share your project on Instagram! If you have your account you can tag me under
@happyheartsy. I would love to see your finished Baseball Hat Hanger so I can share it with others.
This pattern and all images associated with this pattern cannot be sold or claimed as your own.
You are allowed to sell finished Baseball Hat Hanger. Feel Free to mention me for creating this
pattern! It would make my day and I can share your finished project on my social media if you allow.
If you need help with this pattern or you have any questions, don't hesitate to email me on
lenka@happyheartsy.com. I'll be happy to help you:)
Materials:
Cotton Yarn - Bernat Handicrafter 100% Cotton, White Off
Hook - 5mm / H-8
Wooden Dowel - 12” long
Scissors, Yarn Needle, Stitch Markers
Gauge:
14sts x 12rows = 4” x 4” (10cm x 10cm)
Dimensions:
length - depends on how many baseball hats you’d like (min. 8” for one hat)
width - 12” with wooden dowel
Time breakthrough of the video:
0:28 - What you need for this pattern
1:22 - Directions
21:24 - How many rows you need for your hat organizer
26:04 - How to attach the wooden dowel
31:18 - How to make the stripes
38:49 - How to attach your stripes to your organizer
NOTES:
1. You always make ch 1 after DC row. Ch 1 is only a turning ch.
2. You always make ch 2 after SC row. Ch 2 counts as a first DC of the next row.
3. Every odd number of the row (DC row) is the right side
4. Every even number of the row (SC row) is the wrong side
Abbreviations:
Ch - chain
FDC - foundation double crochet
DC - double crochet
FPDC - front post double crochet
SC - single crochet
TRC - triple crochet
FTRC - foundation triple crochet
St - stitch
2 VERSIONS OF THIS PATTERN:
Let’s pick what version you’d like to make.
1. you can make your hat organizer a little bit wider so you can hang your glasses on the side as well (see the pictures)
2. or you can make it only for the hats so you’ll start with less stitches.
The pattern guide follows 37 (27) when 37 means number of the stitches for the first version (hat + glasses) and 27 (number in the bracket) means number of stitches for the second version (hat organizer only).
Directions (1:22 YouTube video)
Ch 37 (26)
ROW 1 - Into the 3rd ch from the hook make DC, then DC in each chain until the end of the row. Ch 1.
Turn (continue with ROW 2)
OR
36 (26) FDC - counts as a first row (if you’d like to learn how to foundation double crochet, feel free to visit this link where I explain how to do so). Ch 1. Turn.

ROW 2 - SC in every stitch until the end of the row. Ch 1. Turn. (total 36 (26) sts)

ROW 3 - You make your first FPDC around the 2nd DC from the previous row (pull up the loop a little bit more to make your row even).
Into the next SC st from the previous row you make a regular DC. Next st FPDC around the next DC from the previous row. Now you alternate regular DC into the SC st from the previous row and FPDC around the DC from the previous row.
Your last DC should be FPDC around the last DC from the previous row. Ch 1. Turn. (total 36 (26) sts)

ROW 4 - SC in every stitch until the end of the row. Ch 2. Turn. (total 36 (26) sts)
ROW 5 - Into the 2nd st make a regular DC into the SC st from the previous row. Then around the next regular DC from the previous row make FPDC. You keep alternating regular DC and FPDC until the end of the row. Your last DC should be a regular DC into the last st. Ch 1. Turn. (total 36 (26) sts)

ROW 6 - SC in every stitch until the end of the row. (total 36 (26) sts)
Repeat from ROW 3 to ROW 5 (your last row is in DC and FPDC). (36 (26) sts)
How many rows you need for your hat organizer (both version)
The number of rows depends for how many hats you’d like on your organizer. Please see the chart below. Basically minimum rows are 25 for one hat. For additional hat you have to add always 12 rows. Your last row is always in DC/FPDC row.
1 hat = 13 + 12 rows (in total 25 rows)
2 hats = 13 + 12x2 rows (in total 37 rows)
3 hats = 13 + 12x3 rows (in total 49 rows)
4 hats = 13 + 12x4 rows (in total 61 rows)
5 hats = 13 + 12x5 rows (in total 73 rows)
6 hats = 13 + 12x6 rows (in total 85 rows)
7 hats = 13 + 12x7 rows (in total 97 rows)
8 hats = 13 + 12x8 rows (in total 109 rows)
How to attach the wooden dowel (26:04 YouTube video)
Once you are done with your last stitch of this wall hanging, ch 1 and turn. Grab your wooden dowel and make a SC around it for the entire row (36 (26) SC around the dowel). Once you are done with your last SC around the dowel, continue with a FCH for 36 (26) chains, slip st on the other side,
weave in the ends.

HOW TO MAKE THE STRIPES (31:18 YouTube video)
Stripes are very easy as it’s done in TRC row.
You have two options how to start.
1. FCH - you make 38 (28) ch
ROW 1 - Insert your hook into your 4th ch from the hook (first 3 skipped chains count as a first TRC), TRC until the end. In total 36 (26) sts.
- if you decide to make the FCH and first row separately, leave a little longer tail at the end so you can attach the row on your one side right away to your organizer.
OR
2. FTRC - you make 36 (26) TRC. If you’d like to learn how to make Foundation Single/Double/Triple Crochet, feel free to visit this video where I explain this technique. Highly recommended!
- if you decide to make the FTRC leave a little longer tail at the beginning and also at the end. With those tails you can attach the stripe to your organizer.
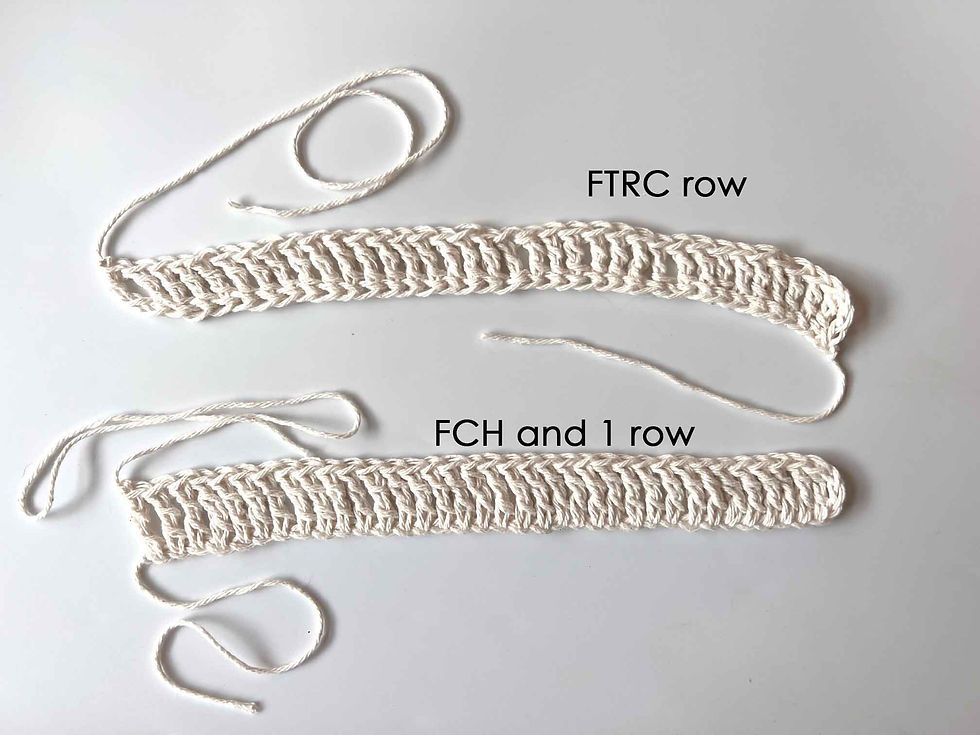
On the picture you can see the difference with the tail between FTRC row and FCH and 1 row. With your FTRC row you leave both tails a bit longer to attach the stripe to your organizer. With your FCH and 1 row you have both tails on one side. In that case you need to get a new yarn for the other side to attach the stripe.

How to attach your stripes to your organizer (38:49YouTube video)
1. Grab your stitch markers (as many as you need for your hats) and insert them in to your 13th, 25th, 37th, 49th, 61st . . . etc. row as you see on the picture (the picture shows the organizer for 5 hats). The row should be always the DC row.
2. Now grab your stripe and align it with the 13th row (or any row where you have the stitch marker) and attach the sides.

IF you make the version for the glasses it’s up to you what side you want to have them on. On the picture it is on the left side but it can be easily done on the right side as well.
FOR the glasses version, you attach the side first and then you weave the yarn through the 10 stitches on the bottom row as you see on the picture. Once you are at the 10th st from the side, then you weave the yarn through the stitch and the organizer so the stripe is divided for two parts.

Ta-da! Your Baseball Hat Organizer is done and now you can have your hats nicely organized. Don't hesitate to share your finished project with me! I would love to see your work!
Thank you.


Could you give me any length recommendations in inches or centimeters? I am using a different yarn and hook size, so the length in rows isn't helpful for me. I am planning to add four hats if that is of any use. I am loving how the pattern is working up so far as well!!
How much yarn is needed? I can't find the Bernat Handicrafter in my local stores so I'm going to order it online but you don't mention the amount of yarn you used. Thanks a bunch!